Symmetry in composition means arranging the elements in a frame so one side mirrors or balances the other across a clear axis: a vertical line down the middle, a horizontal line across it, or a point that everything radiates out from. To use symmetry in composition well, find that axis first, hold the camera level and square to the subject, then decide whether the axis belongs in the center of the frame or on a third.
It is the fastest composition fix I know. A dull walkway with lamps on both sides becomes a strong photograph. A puddle, a shop window, or a row of identical windows turns into structure. You do not need a special camera, and you do not need perfect symmetry, because small deviations often read as deliberate.
This guide covers what symmetry is, the four types you will meet, a repeatable six-step process for finding and refining a symmetrical frame, and the mistakes that make centred pictures feel static. It takes about ten minutes to practise if you already own a camera, and a phone works nearly as well.
Table of Contents
- What You Need
- How to Use Symmetry in Composition, Step by Step
- Step 1: Find a clear symmetrical subject
- Step 2: Turn on a compositional grid
- Step 3: Choose central or offset symmetry
- Step 4: Control the axis and surrounding lines
- Step 5: Balance the image with light and space
- Step 6: Check the result and make small adjustments
- Common Mistakes to Avoid When You Use Symmetry in Composition
- Frequently Asked Questions
- What is symmetry in composition?
- What is the rule of symmetry?
- What are the rules for symmetry in photography composition?
- Can you give me some examples of symmetry in art?
- How do I avoid perspective distortion in symmetrical photos?
- When should you not use symmetry in a photo?
- Conclusion
What You Need
Symmetry is a way of looking, not a piece of kit. Nothing on this list is required, and every item is something you may already own.
- A camera or phone camera. Anything with a viewfinder or screen works. Resolution matters far less than whether you can hold the camera level and see the frame edges.
- A grid overlay. Most cameras have one built into live view, and most phone cameras hide it in settings. It gives you centre lines and thirds lines to check placement against.
- Something reflective. Still water, wet pavement, a window, a mirror, polished metal, or a glass building. This is where most strong symmetrical frames come from.
- A tripod, optional but useful. Helpful when the axis has to stay perfectly vertical for a long exposure or a low-light reflection.
- A remote or two-second timer. Removes the shake from pressing the shutter, which matters more than people expect on careful architectural work.
- A polarising filter, optional. Cuts glare off water and glass so the reflected half matches the direct half.
If you are just starting out, the grid and ten minutes of walking around a street are worth more than any accessory.
How to Use Symmetry in Composition, Step by Step
Work through these in order. Skipping to the shutter release is why most symmetrical frames fall flat.
Step 1: Find a clear symmetrical subject
Look for anything that repeats: paired windows, a row of identical columns, a path with trees spaced the same on each side, a staircase, a bridge railing, or two lamps casting matching shadows. Bilateral symmetry means the left and right halves mirror each other. Radial symmetry means shapes spread out from a central point, such as a spiral staircase or a flower seen face on.
Simplify before you shoot. Step sideways or a few paces back until the distracting clutter falls outside the frame. If you cannot remove it with your feet, walk further. A symmetrical subject surrounded by chaos reads as a mess, not as balance.
You will know it is working when you half-close your eyes and the two sides still look like the same picture.
Step 2: Turn on a compositional grid
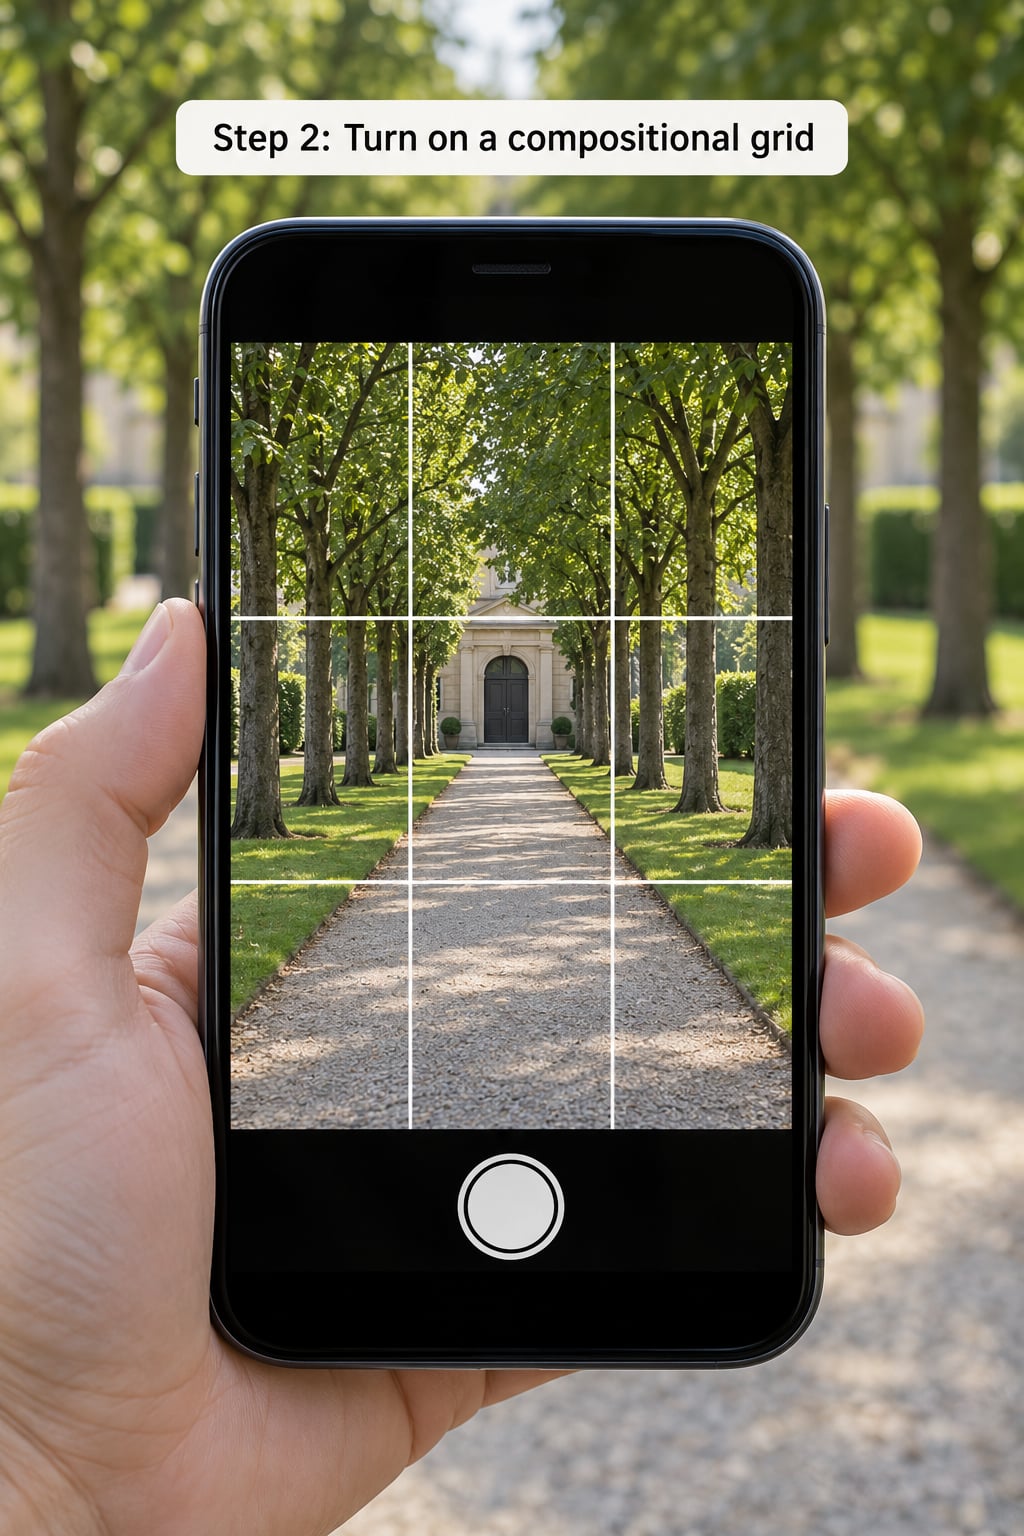
Grid lines are how you use symmetry in composition without guessing. On most cameras, look for grid or composition guide settings in the shooting or display menu and turn on the frame plus the thirds lines. On a phone, open the camera, find the grid icon in the controls, and switch it on. Some newer phones offer a level indicator, which is worth enabling too.
The centre lines are the ones that matter most here. They show you whether the subject is truly centred and whether verticals are converging. Thirds lines matter for the off-centre version. The grid is a checking tool, not a composition you have to obey.
Step 3: Choose central or offset symmetry
Put the axis in the middle when you want order, formality, or impact. A dead-on doorway, a cathedral facade shot square to the lens, and a reflection split exactly in half all read as calm and deliberate. Central symmetry suits architecture, minimal scenes, and anything you want to feel monumental.
Move the axis off-centre when only part of the scene is symmetrical, or when the scene is busy and a centred frame would lock up. Put the mirror line on a thirds line instead and let the pattern carry the rest of the frame. This is the same move the rule of thirds makes, just with a symmetrical subject doing the balancing.
That is really the whole difference. Thirds put the subject off-centre for tension. Symmetry can do the same thing, but it hands you a mirror to keep it interesting.
Step 4: Control the axis and surrounding lines
Stand square to the subject. The most common reason a symmetrical frame fails is not lighting or gear, it is the photographer standing half a step to one side so the two halves no longer match. Move your feet until the verticals are parallel and the axis runs dead straight through the frame.
Keep the camera level. A small tilt looks like a mistake in a symmetrical picture because there is nothing else in the frame to justify it. On a building, step back rather than angling up from close range, since wide lenses taken from below make parallel lines converge and pull the symmetry apart.
Check what points at the centre. Leading lines, railings, and roof edges that converge on the axis reinforce the balance, which is why a straight path shot from the middle is so satisfying. Lines that point off to one corner fight it.
Step 5: Balance the image with light and space
Expose so both halves match in brightness. With a reflection, meter from the direct side so the darker reflected half does not turn into black, and check the histogram so nothing important is clipping. With architecture, watch for a bright sky pulling the facade into shadow; a reflector or a slight change of angle fixes it faster than any edit.
Leave the space the symmetry needs. If the axis is vertical, the frame usually wants equal room on the left and right and a clear run above or below. Resist pushing into a frame edge, because anything that pokes in from a side immediately unbalances a centred picture.
Step 6: Check the result and make small adjustments
Review on the camera screen at full size rather than the small thumbnail. Zoom into the four corners and look for stray signs, wires, litter, or a foot that has crept into the edge. Then step a pace sideways and take a second frame; often the version from half a step over is the one where the halves finally match.
Take the shot once the geometry is right, before you start fine-tuning the light. Symmetry is a structural decision, and you get one clean chance at it.
Common Mistakes to Avoid When You Use Symmetry in Composition
Forcing symmetry that is not really there. If the two halves only look similar when you stare, move on. Crop tighter instead, or accept the frame as an asymmetrical composition and let one side carry more weight.
Standing at an angle. The single most common error is a photographer who drifted sideways after finding the subject. Square up first, then worry about light.
Tilting the camera. A few degrees of tilt that nobody would notice in a normal landscape looks broken in a symmetrical frame, because the two halves no longer sit level against each other.
Letting things intrude at the edges. A lamp post half in on one side, a passer-by on the other, or a branch in the corner destroys balance more effectively than any lighting mistake. Walk until the edges are clean.
Centring without a focal point. A perfectly centred frame can still be boring if nothing holds the eye. Put the sharpest detail, the strongest contrast, or the only warm colour right on the axis, and let the rest soften.
Ignoring the background. Signage, cables, air conditioning units, and litter usually break the pattern. Look behind the subject before you commit.
Using symmetry in every frame. This is the mistake photographers on r/photography and r/AskPhotography complain about most: a whole set of centred frames that all feel the same. Alternate a symmetrical shot with an off-centre one and the sequence reads with far more energy. Admitting that a symmetrical frame came out static, and why, tells you more than any rule.
Frequently Asked Questions
What is symmetry in composition?
Symmetry in composition is a technique where elements on one side of an image mirror or balance the elements on the other side across a central axis. That axis can run vertically, horizontally, or radiate out from a central point. Because the human eye reads matching halves as order and calm, symmetrical frames feel stable and formal, and a plain subject such as a doorway or a puddle can suddenly look composed.
What is the rule of symmetry?
There is no fixed rule attached to symmetry, only a principle: elements placed either side of a mirror line should have similar shape, size, tone, or subject matter so the frame reads as balanced. In practice the useful rules are technical rather than artistic. Keep the mirror line straight, keep the camera level, and make sure the two halves carry similar visual weight.
What are the rules for symmetry in photography composition?
Six habits cover most symmetrical photographs. Find a subject that genuinely repeats, clear the frame of clutter, turn on the grid and keep verticals parallel, stand square to the axis, expose so both halves match in brightness, and check the four corners for stray objects. Follow those and the structure is right, leaving you free to decide whether the axis belongs in the centre or on a third.
Can you give me some examples of symmetry in art?
Classical art uses symmetry as structure and status. Alhambra tilework and other Islamic geometric patterns repeat eight-pointed stars around a centre. Renaissance altarpieces and cathedral facades mirror around a vertical axis. Radial symmetry appears in rose windows, mandalas, and sunflowers, while reflective symmetry shows up in still lakes and polished floors. In photography the same four patterns appear in buildings, puddles, staircases, and doorways.
How do I avoid perspective distortion in symmetrical photos?
Distortion comes from position, not the lens. Standing close and angling up or down makes parallel lines converge and breaks the mirror. Step back until the whole subject fits, hold the camera level, and set the sensor parallel to the plane you are photographing. If you need to get closer, use a longer focal length instead of moving in, and correct what is left in the crop step.
When should you not use symmetry in a photo?
Skip it when the scene has no repeating structure, when the story depends on one side, or when you have already made several symmetrical frames in a row. Perfect symmetry also weakens emotional scenes, because people rarely look like mirrored pairs. In those cases use asymmetrical balance instead: put the largest or brightest element off-centre and let a smaller or darker element on the other side pull against it.
Conclusion
Start with one thing tonight: turn on your grid, walk ten minutes, and find a single line of symmetry. Shoot it once dead centre and once with the axis on a third, then compare. Everything else in this guide, the perspective control, the exposure matching, the corner check, refines a frame you have already got structurally right.
Once the geometry feels automatic, the interesting work starts: reflections, radial patterns, and off-centre axes that surprise people.