A crooked horizon is the line where water or land meets the sky, sitting at an angle instead of running level across the frame, and the eye finds it instantly. To fix a crooked horizon, open your crop tool, rotate the image until that line is level, then crop away the empty wedge the rotation leaves behind. In Lightroom Classic and Photoshop the whole job takes about two minutes, and nothing is baked into the file until you export.
The reason it matters so much is human, not technical. Our visual system is absurdly good at detecting tilt, so a sloping horizon reads as a mistake within a fraction of a second and drags attention away from whatever you actually meant to photograph.
Most people never notice the tilt in their own shots. It shows up when the image is small on a phone screen, or when someone else points it out months later. A ten-second check at the start of an edit catches it before it goes any further.
Table of Contents
- What You Need
- Step-by-Step
- Check the Tilt and Choose a Correction Method
- How to Fix a Crooked Horizon in Lightroom Classic
- Fix the Horizon in Photoshop
- Check the Corners and Refine the Crop
- Compare, Save, and Export the Corrected Photo
- Common Mistakes
- Preventing Crooked Horizons in Future Photos
- Frequently Asked Questions
- Can I fix a crooked horizon in a photo without losing part of the image?
- Why does my photo have blank corners after I straighten it?
- Is automatic straighten accurate for wide outdoor views and buildings?
- How do I fix a tilted horizon on a phone?
- Should I correct a crooked horizon before or after cropping the photo?
- Start With an Automatic Correction, Then Check the Grid
What You Need
Start from the original file, not a JPEG you have already saved twice. If you shot RAW, do the rotation in the Develop module where it stays non-destructive; if you only have a JPEG, work on a copy.
You need an editor with a crop tool that rotates. That covers Lightroom Classic, Photoshop, Capture One, Affinity Photo, GIMP and the free Google Photos or Snapseed apps. Beyond that, three small habits do most of the work:
- A straight reference. The grid in Lightroom and Photoshop is enough for most frames. For architecture, a camera’s built-in level lines are better.
- A comparison view. Lightroom’s Y key and Photoshop’s key flip between before and after, so you can see the tilt without guessing.
- Crop headroom. A two degree rotation on a wide frame eats a strip along two opposite edges. Shoot with a little extra space at the top and bottom, or frame the subject away from the very edge of the frame, so you have something to cut.
Step-by-Step
Check the Tilt and Choose a Correction Method
Open the image and hit the before-and-after toggle, or simply shrink it to a small size in the view. At thumbnail scale the tilt is obvious in a way it never is at full size, because the whole frame is small enough to take in at once.
Then turn on the grid: View to Grid to Enable Line Guides in Lightroom Classic, or View to Show to Grid in Photoshop. In the crop overlay, the grid is the outer thirds lines plus the centre cross, and a level horizon should sit parallel to them.
Three methods cover almost everything:
- Automatic for a clean, high-contrast horizon line such as a sea line or a distant ridge.
- Guided, dragging one or two lines onto the horizon yourself, for busy water or a horizon broken by waves and posts.
- Angle slider, a number you dial in for architecture where verticals also need attention.
How to Fix a Crooked Horizon in Lightroom Classic
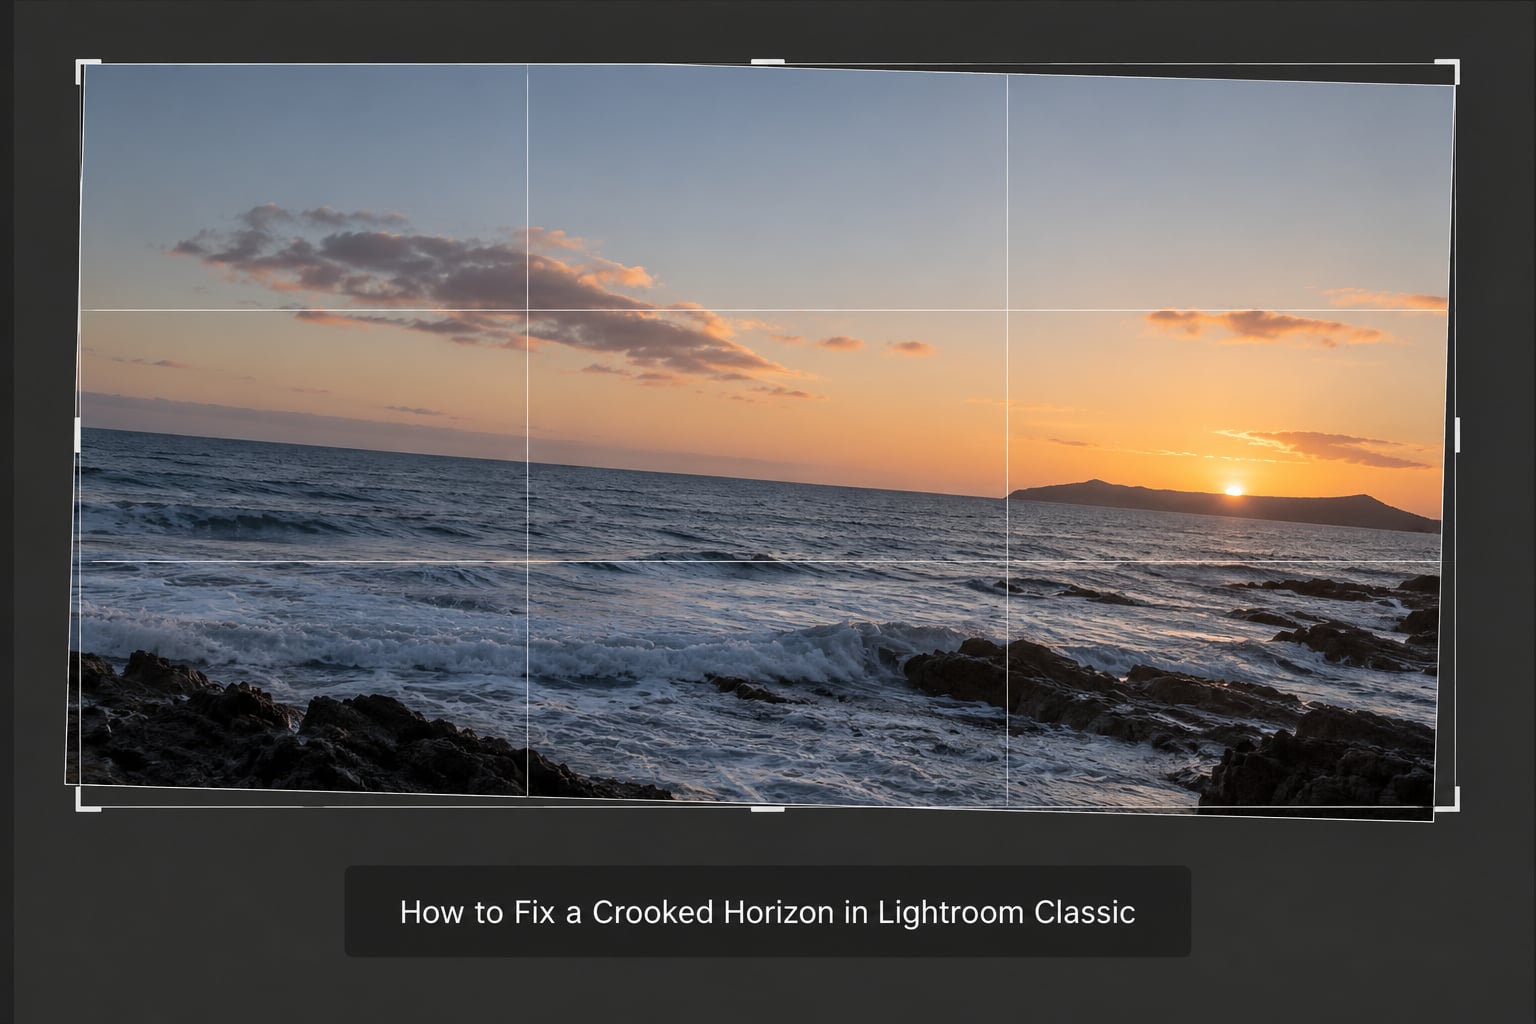
Go to the Develop module, then to the Crop Overlay tool below the histogram. Lightroom draws a crop box over the image, and the empty area outside it is what a rotation will consume.
Click Auto in the options bar and Lightroom scans for a strong straight line and rotates to match it. For a clean sea or lake horizon that is often all you need. If it grabs the wrong line, press the reset icon in the options bar to undo it rather than nudging from a bad starting point.
For more control, click Level, which is the spirit level, or drag the Angle slider. You can also press Ctrl (Cmd on a Mac) and drag across the horizon inside the crop box, and Lightroom rotates as you drag, snapping to the nearest degree. That drag is the fastest way to square a frame when the horizon itself is hard to see.
Set the angle, then let go of the mouse and adjust the crop box to sit just inside the tilted image. Set the overlay to Grid to check the horizon against the lines before you commit.
For a frame that also has leaning buildings, move to the Transform panel. The Upright buttons handle perspective, not simple rotation: Auto is the sensible first try, Guided lets you mark up to two vertical and two horizontal lines, and Level keeps verticals vertical while levelling horizontals. Expect any Upright mode to crop harder than plain rotation does.
Fix the Horizon in Photoshop
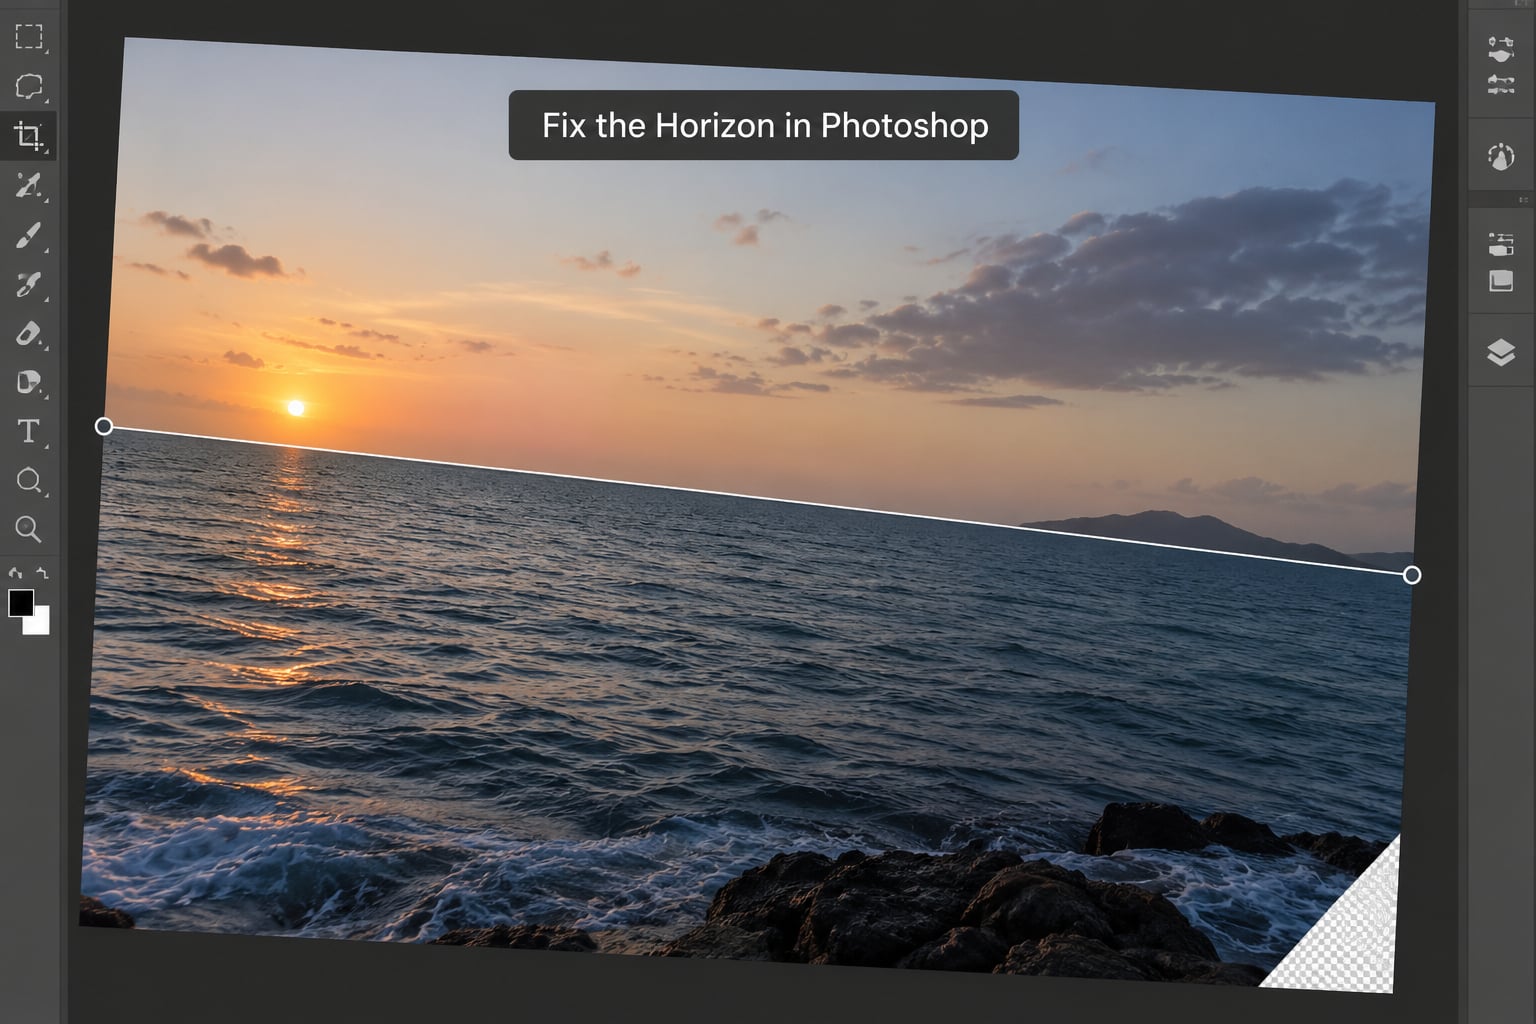
Open the image, press C for the Crop Tool, and tick Content-Aware Fill in the options bar. That setting fills the empty corners Photoshop creates with pixels borrowed from nearby areas, which works well for sky, water or sand and poorly for a busy street.
Hold Alt (Option on a Mac) and drag from one end of the horizon to the other. Photoshop rotates the image along that line as you drag. Release, then press Enter to accept.
If you have no horizon to draw along, set the angle numerically. Open the crop box handles, then hold Shift while dragging the corner to rotate in fixed five degree steps, or use the angle field in the options bar to type an exact value.
For a sideways image, use Image to Transform to Rotate 180 degrees. That is a pure pixel rearrangement, so it costs nothing. Anything else uses Image to Transform to Rotate, which resamples.
When you want Lightroom’s controls inside Photoshop, use Filter to Camera Raw Filter and open the Geometry section, where Auto, Guided, Level and the angle slider all live on one panel.
If Content-Aware Fill cannot cover a corner well enough, enlarge the canvas instead: Image to Canvas Size, set the anchor to a corner, add about 3% to width and height, and fill the new area with the background colour before using the Clone Stamp.
Check the Corners and Refine the Crop
Rotating turns two opposite corners into triangles of nothing. That is the part people complain about, and the fix is to crop rather than to invent pixels.
After rotating, check what the rotation actually cost you. On a 6000 by 4000 image turned two degrees, the rotated frame needs roughly 6136 pixels of width to hold the same content, which means you are giving up about 136 pixels of height. Two degrees costs you a thin strip. Eight degrees on the same frame costs well over 500 pixels and a noticeable band.
Crop to the largest rectangle that keeps everything you care about, then look at the four corners. If a subject, a boat, a person’s head or a reflection sits near the edge, you have two choices: accept the tighter frame, or go back and rotate the image in the opposite direction by the same angle so you lose material from the other side instead.
That second option is the one most beginners never try. A picture tilted one and a half degrees can be corrected either way round, and the direction you choose decides what gets cut.
Compare, Save, and Export the Corrected Photo
Press the before-and-after key and look at the corrected frame with the tilt deliberately reintroduced in your mind. If you still feel a slope, the correction is short. Most people stop a degree too early, thinking they have made the image worse, then ship it slightly crooked.
One more check matters for buildings: rotation levels the horizon but does nothing about converging verticals. If a tower still leans, that is perspective, and it needs the Transform panel or Photoshop’s Camera Raw Filter, not more angle.
In Lightroom Classic, the rotation is stored as a crop and angle setting in the Develop module. Reset it from the Crop panel options whenever you like, so there is no reason to duplicate the file first. Move on to your next image while keeping the Develop module open; if the tilt keeps recurring, copy the settings from a corrected image and paste them onto the rest of the shoot, which is the batch workflow most people ask about.
Export at the size you need. If the frame is going to a large print, do the rotation once at full resolution from the original rather than saving an intermediate file, because every rotation resamples the image and a second rotation softens it again.
Common Mistakes
Straightening the wrong line. Auto picks the strongest straight edge it can find, which on a beach shot may be a jetty or a roofline rather than the sea. Reset and use the drag or guided method instead.
Auto says it cannot straighten the image. Lightroom declines when there is no long, straight, high contrast edge to lock onto, which happens with flat water, fog or a horizon broken by waves. Draw the line yourself with Ctrl-drag.
Correcting after cropping. Straighten first, then crop. If you crop to a composition first, every straightening pass eats into a frame you already chose.
Nudging the angle slider. Each small adjustment resamples again on the fly. Decide the full angle, set it in one move, and start from the original if you overshoot.
Leaving gaps to a weak fill tool. Content-Aware Fill is good for open sky and water, poor for texture. Give the corner more room with Canvas Size or crop tighter.
Trying to level a Dutch angle. A deliberate tilt is a compositional choice, and levelling it destroys the effect. A rotated horizon is only a mistake when it was not on purpose.
Expecting rotation to fix warped lines. Barrel distortion from a wide lens makes straight edges bow, and no rotation removes that. Use the Optics panel or Photoshop’s Lens Correction for that.
Preventing Crooked Horizons in Future Photos
Most tilt is avoidable in the camera, and avoiding it costs nothing in image quality. Turn on the camera’s electronic level or grid lines if the body has them, and in live view many cameras show a horizon indicator you can watch while framing.
For anything with a hard horizontal edge, turn the screen or viewfinder ninety degrees and watch the lines. When they stack up flush with the physical lines of a railing or a windowsill, the horizon is level. This is far more reliable than looking at a small rear screen, and it needs no bubble level.
On a tripod, a bubble level on the camera base removes almost all tilt. Handheld, hold the camera with both hands, elbows in, and level the body against the frame lines before pressing the shutter rather than tilting to improve the composition.
Leave a little empty space above the horizon and below the foreground in the frame. That headroom is exactly what a later rotation needs, and a shot with two percent extra is far more forgiving to correct than one shot tight to the edge.
Frequently Asked Questions
Can I fix a crooked horizon in a photo without losing part of the image?
Not quite. Rotating a frame by a degree or two always brings empty wedges into two opposite corners, and something has to go. Your options are to crop that material away, fill it with Content-Aware Fill or Canvas Size in Photoshop, or rotate in the opposite direction so you lose the strip from the other side instead. Shoot with a little extra space above and below and the loss is usually a thin strip nobody misses.
Why does my photo have blank corners after I straighten it?
Because rotating an image inside a rectangular frame leaves triangular gaps where the corners used to be. A two degree turn is mild, but the same photo turned eight degrees loses a wide band along two opposite edges. Crop to the largest rectangle that keeps your subject, or in Photoshop use Content-Aware Fill for open sky and water, or Canvas Size to add pixels and clone them in.
Is automatic straighten accurate for wide outdoor views and buildings?
It is accurate for a clean, straight, high contrast horizon such as a calm sea line or a distant ridge, and unreliable for anything else. Automatic straighten locks onto the strongest straight edge it detects, which can be a roofline, a jetty or a branch rather than the actual horizon, and it refuses entirely when there is no long straight edge to find. For buildings you also need the Transform panel, because rotation does nothing about converging verticals.
How do I fix a tilted horizon on a phone?
In Google Photos, open the image, tap Edit, then Crop and rotate, drag the straighten slider until the frame sits square, and save a copy so you keep the original. In Snapseed, open Tools and Portrait for face shots, or use the Crop tool with its rotate handle and set the frame to a fixed angle. On iPhone, tap Edit, then Crop and rotate, then the straighten icon at the bottom of the crop screen.
Should I correct a crooked horizon before or after cropping the photo?
Before, always. Straightening rotates the whole frame and opens empty space at two opposite edges, and you want to choose the crop after that rotation, not before. If you crop to a composition first, every straightening pass eats into a frame you already settled on, and you end up losing content you had already decided to keep.
Start With an Automatic Correction, Then Check the Grid
Open the original, go to the crop tool, press Auto, and let the editor make the first rotation. Then turn on the grid, zoom to full size, and check the horizon against the lines, because automatic straighten is right far more often than it is wrong and you only need to catch the failures.
Do the rotation in one movement rather than in small nudges, straighten before you crop, and level the image by the opposite direction when the first choice cuts something you wanted to keep. That is the whole job, and it takes about two minutes a frame.