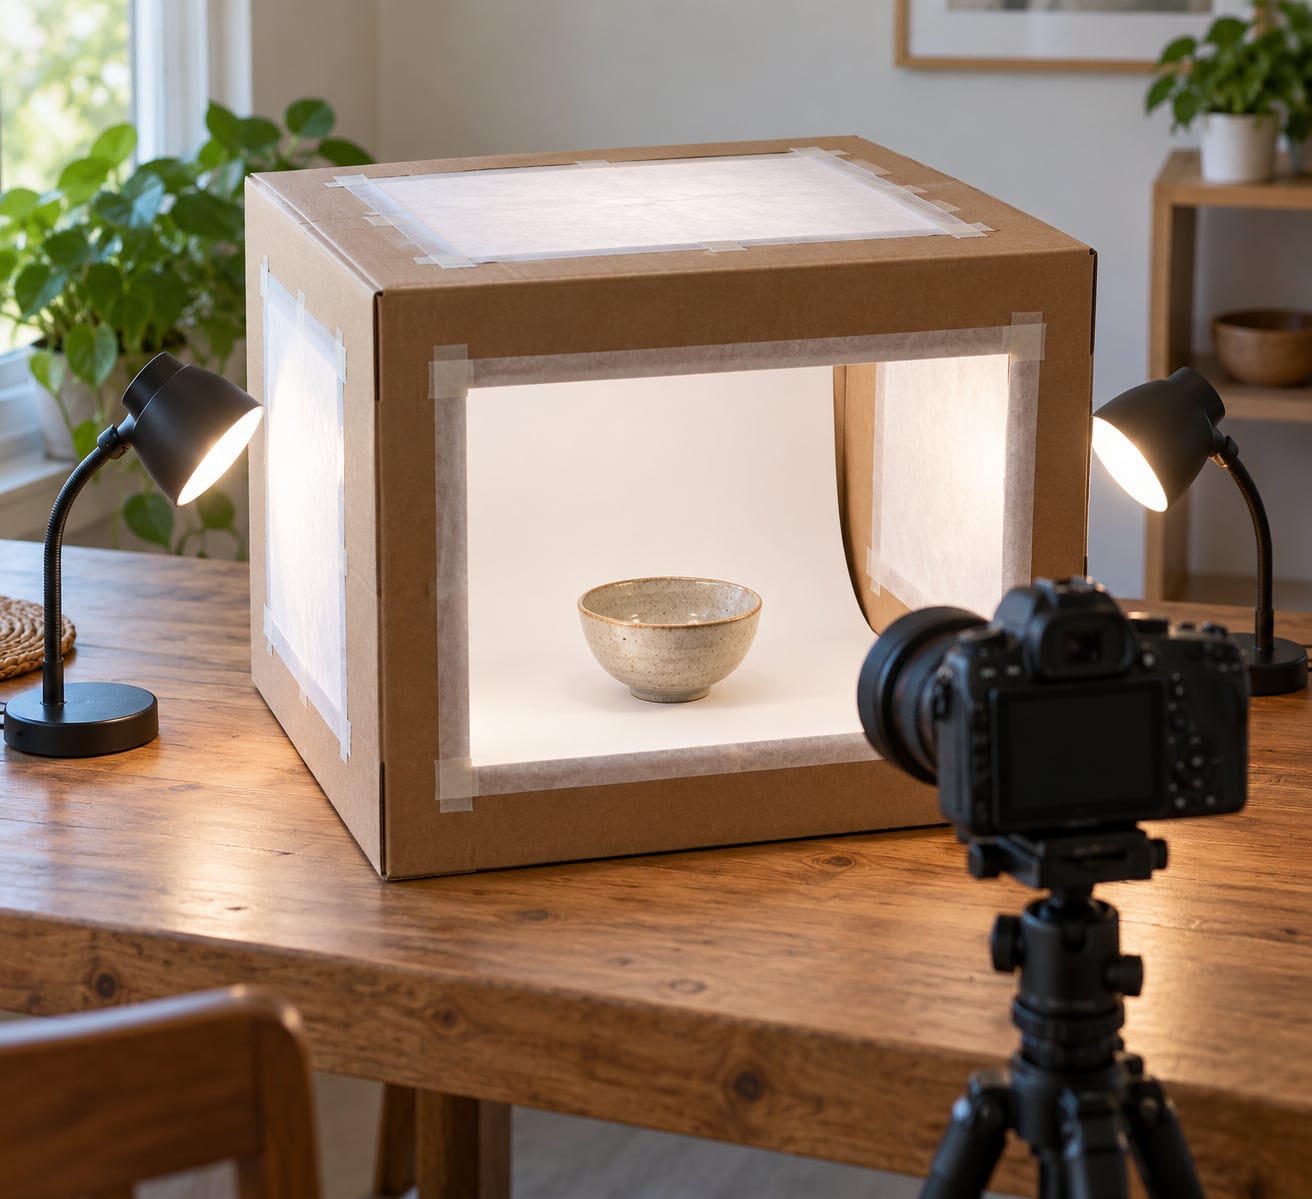
A light box is just an enclosure with translucent windows in the top and both sides and lamps sitting outside those windows, so light wraps around whatever you put inside instead of blasting it from one direction. Cut the windows in a cardboard box, tape some tracing paper over them, park two LED lamps about a foot away, and you have soft, even, shadow-free light for under an hour of work and a few dollars of materials. The whole build takes about 45 minutes including drying time if you paint anything.
The reason to build one instead of borrowing window light is control. Even daylight shifts with the weather and the hour, and a single desk lamp gives you a bright side and a dark side. A light box gives you the same wrap-around light every single shoot, which is what makes product photos look like they were taken in a studio.
Here is how to build a cheap light box at home, in the order I actually do it.
Table of Contents
- What You Need
- Step-by-Step: How to Build a Cheap Light Box at Home
- Step 1: Choose a Box Size and Design
- Step 2: Cut the Light Box Openings
- Step 3: Add a Reflective and Diffusive Interior
- Step 4: Install the Light Source
- Step 5: Add Camera Support and Test the Results
- Camera settings at a glance
- Common Mistakes
- Two Other Builds From the Same Idea
- Variant: a tracing light box
- Variant: a kids sensory light table
- Frequently Asked Questions
- How much does it cost to make a light box at home?
- What size cardboard box should I use for a homemade light box?
- Can I use a regular LED bulb instead of a photography light?
- How do I photograph flowers in a homemade light box?
- Can I make a light box for photographing small objects and crafts?
- Conclusion
What You Need
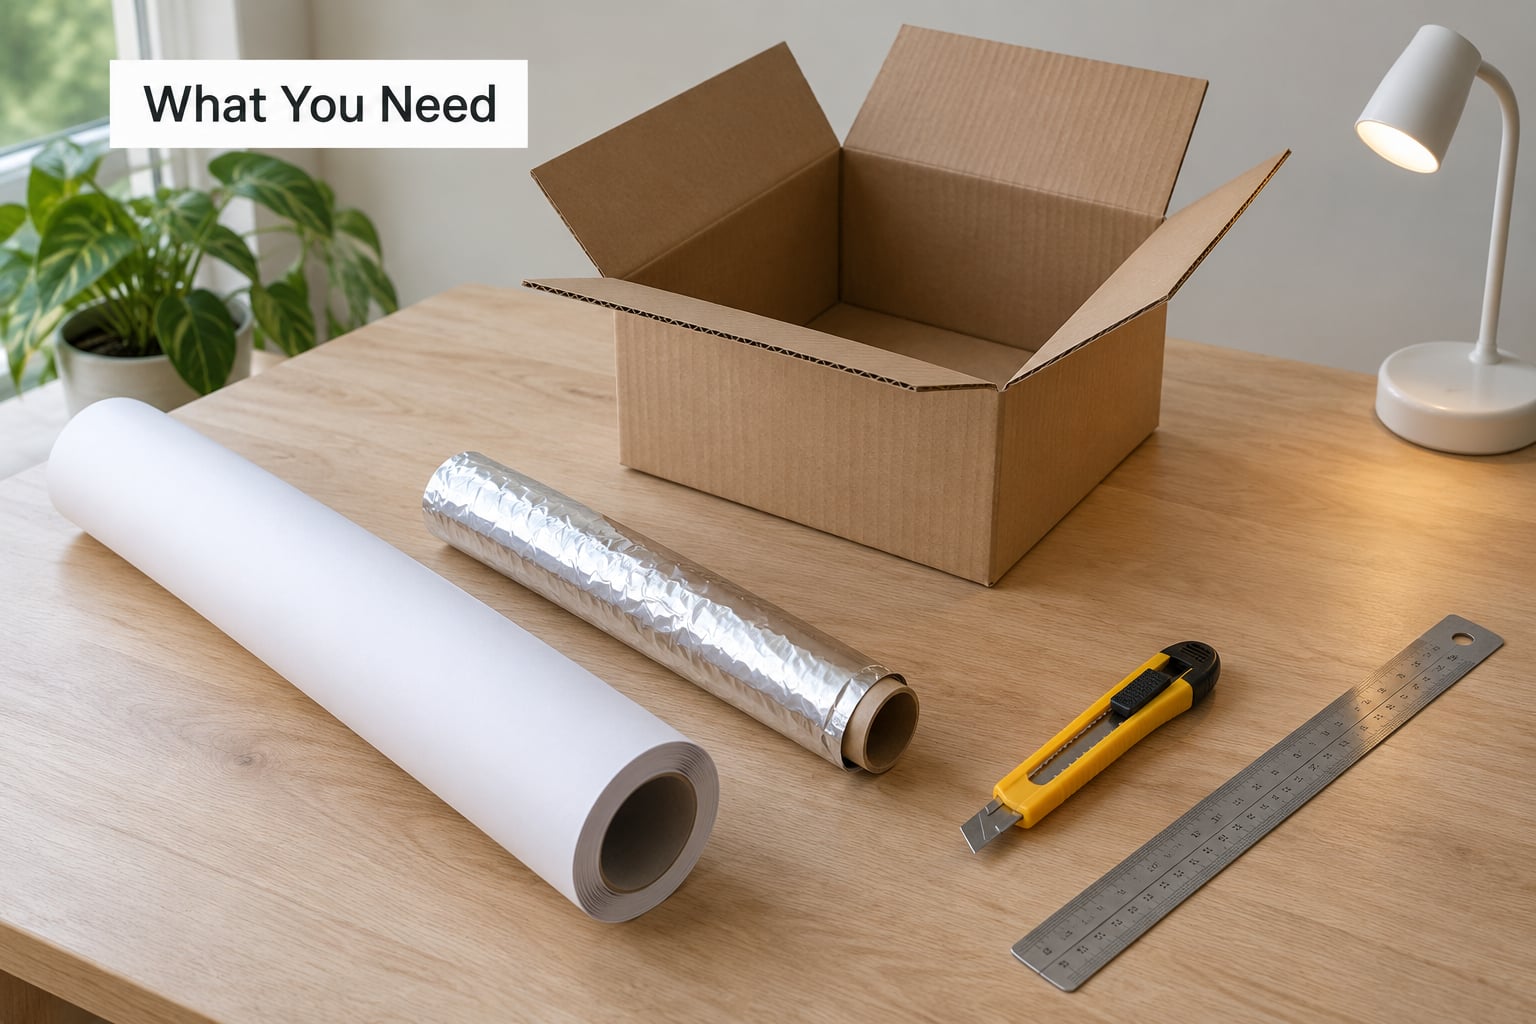
Most of the list is stuff you already own. The box is the shell, the diffuser is any thin translucent sheet, and the interior bounce surface is white poster board or foil.
| Item | Cheap source | What it does |
|---|---|---|
| Cardboard box | A delivered box, roughly shoebox to washing-machine size | The enclosure |
| Translucent sheet | Tracing paper, parchment paper or a thin white fabric | Softens the lamp into an even panel of light |
| White poster board | One sheet, or the white inside of the box lid | Bounce surface for the interior |
| Two LED lamps or one LED strip | Clamp work light, small LED lamp, or a strip wound round the box | The light source |
| Masking tape or hook-and-loop dots | Craft drawer | Holds the diffuser so you can swap it later |
| Utility knife and steel ruler | Tool box | Cutting the windows |
| Binder clips | Desk drawer | Holds the backdrop sweep in place |
Two items on that list actually change how good the light is. The diffuser decides how harsh the shadows are, and the interior bounce surface decides how much light bounces back onto the shadow side of your subject. Everything else is structure.
Substitutions that work well: a plastic storage bin with a translucent lid instead of a cardboard box, an old metal cake pan or a rigid suitcase instead of a box, and aluminum foil taped to the walls instead of paint. A white sheet hung over a table with the subject underneath works as a no-build version, and north-facing window plus a bedsheet is the classic free substitute when you only need daylight softness.
Substitutions that cause trouble: wax paper, which is too translucent and gives you a visible hot spot; clear plastic sheeting, which does nothing to soften light; and painted plastic that was not scuffed and primed first, because the paint peels off within weeks.
Step-by-Step: How to Build a Cheap Light Box at Home
Step 1: Choose a Box Size and Design
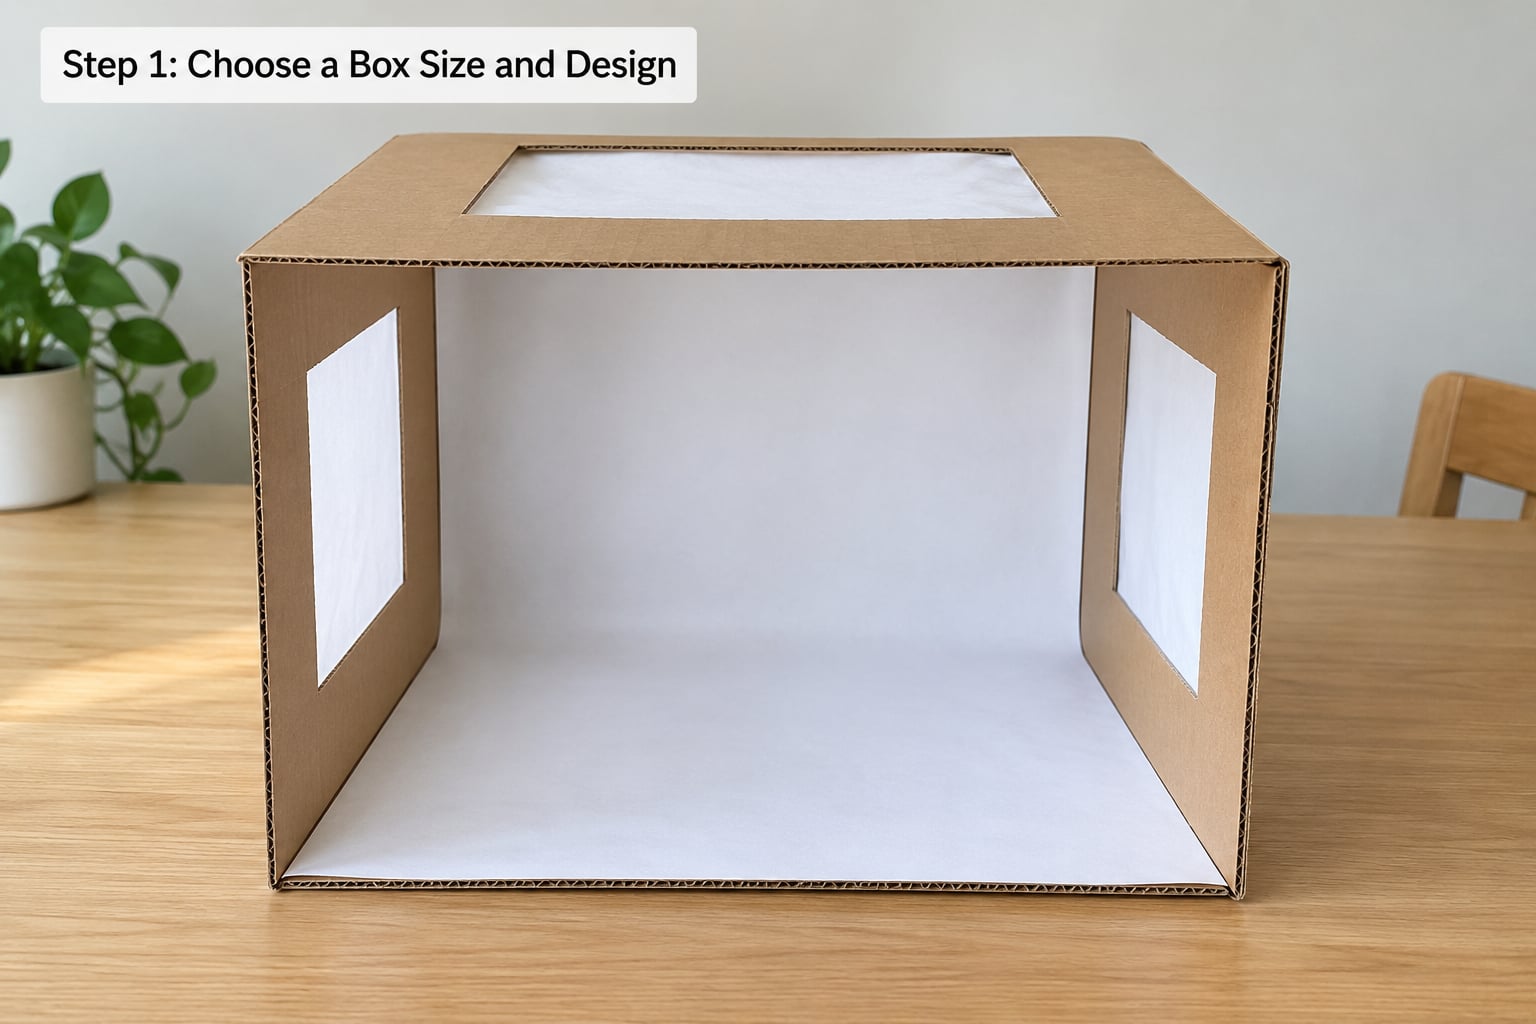
Pick a box that gives your subject at least four inches of working space on each side, because anything tighter and the light hits only the top of the object. A shoebox works for rings and small electronics. A twelve-inch scrapbook box handles cosmetics and jars. A box the size of a medium parcel suits plates, folded fabric and craft projects.
Depth matters more than width. A deep box throws the lamps further from the subject, which makes the light softer, so a deeper box is the upgrade if you only get to buy one thing. Wide and shallow is the hardest build to light evenly.
If you do not want to cut anything, use a design with solid side panels and two LED panels standing just outside them. It costs less and takes ten minutes, but you lose the diffuser, so shadows are harder and the light is less even.
Work on a flat surface and put the camera-facing panel down as the front. Decide now which panel faces the camera, because everything else is arranged around it.
Step 2: Cut the Light Box Openings
Cut three openings: one in the top panel and one in each side panel. Three is the number that matters, because every light adds one more direction that has no shadow in it. One window gives you a single light direction and the same hard shadow a desk lamp gives. Three windows mean a shadow under the object is filled by the other two, which is the whole point of the box.
Measure first and cut last. Score a straight line with the knife against the ruler, then take the blade through in two or three light passes. Cutting all the way through on the first pass is how cardboard ends up with a ragged, torn hole.
Keep each opening a half inch smaller than the panel it sits on, so the diffuser overlaps the edge and no raw light leaks past it. Leave the bottom solid, and leave a corner or two of each side panel uncut so the box keeps its rigidity. A box with three floating flaps becomes a tray.
Tape the inner edge of every cut with a strip of masking tape. It takes a minute and it stops the corrugated fluting from shedding into your shots. Cut away from your body, on a cutting mat or a scrap of cardboard, not on your lap.
Step 3: Add a Reflective and Diffusive Interior
Lay white poster board across the bottom and up the back wall as your base. Bend it into a curve where it meets the floor instead of leaving a hard crease, because a crease is a visible line in a white background. This curved white surface is the seamless sweep, and it is what removes the horizon line you would otherwise get from a flat backdrop.
Line the remaining walls with whatever bounces best. Matte white paint is the best surface because it scatters instead of mirroring. Aluminum foil bounces more light but throws a faint crinkle pattern onto glossy subjects, so crinkle it slightly and keep it away from anything reflective. Matte white poster board is the safe default.
Now the diffusers. Different materials handle different jobs.
| Diffuser | Opacity | Durability | Best for |
|---|---|---|---|
| Tracing paper | Medium | Tears when wet, yellows slowly | Everyday product shots, the all-round choice |
| Parchment or wax paper | Low | Creases permanently | Nothing, it is too thin and shows the hot spot |
| Tissue paper | Low to medium | Very fragile | Quick tests, single-session use |
| Thin white fabric | Medium to high | Washable, reusable | A box you use weekly, or light that needs softening more |
| Frosted acrylic | High | Lasts for years | A box you build once and keep, and tracing work |
Tape or stick the diffuser over each opening from the inside so it sits between the lamp and the subject. Fix it with tape or hook-and-loop dots rather than staples, because a sheet fixed with staples cannot be replaced when it tears, and you will want to swap materials while you test.
Two layers of thin material beat one layer of thick material. Stacked tracing paper softens the light further without costing much, and it is easy to remove one layer at a time until the evenness looks right.
Step 4: Install the Light Source
Lamps go outside the box. That is the detail every quick tutorial mentions and almost none explain: a bare bulb inside the box is a point source a few inches from your subject, which is the definition of hard light, and you will also be baking the box from the inside.
Stand each lamp roughly ten to fourteen inches from the panel it lights, at a slight downward angle, and offset it so the lamp body itself is outside your camera’s view through the front opening. LED strips give the most even result because the emitting surface is long rather than a point. A clip lamp on a stand or a stack of books works fine too.
Give each lamp about the same distance and the same height. A lamp closer to the box makes that side brighter, and that is the single most common reason a DIY light box looks uneven.
Run cords through the gap at the back, not over the top, and tape them down so nothing dangles in frame. With LEDs you can skip ventilation, since they run cool. With an incandescent or halogen bulb, leave a vent gap at the top and touch-test the panel after a long session.
Light quality comes down to two things: colour temperature and colour rendering. Aim for a lamp rated near 5000K, which matches daylight and keeps white paper white. A cheap bulb with a low colour rendering index makes reds and skin tones drift, which matters if you shoot cosmetics or food. Set your camera’s white balance to a fixed daylight setting rather than auto, and the box will look consistent even if you swap bulbs later.
Step 5: Add Camera Support and Test the Results
Put the camera on a tripod or a stack of books directly in front of the open panel, lens level with the middle of the subject, and shoot square on. An angle turns the white sweep into a visible side wall and reintroduces gradient.
Start at the widest aperture your subject allows, the lowest ISO the camera will tolerate, and a shutter speed fast enough to hand movement away, then adjust with the aperture. Set white balance to daylight or to a fixed Kelvin value and leave it there.
Test evenness before you shoot anything you care about. Put a grey card or a plain sheet of white paper on the sweep, fill the frame with it, and look at the histogram or the photo on your camera screen. Any step in the histogram means the box is uneven, and the fix is the lamp that is too close or too high. A quick test frame costs nothing and saves the whole session.
Watch for the box itself appearing in reflective subjects. Phone cases, jewellery, glossy packaging and metal all mirror the frame and the raw cardboard. Bigger windows and more wrap-around light reduce it, and the last fix is to move the subject a little further from the walls so the reflection lands somewhere less obvious.
Camera settings at a glance
| Setting | Starting point | Why |
|---|---|---|
| Aperture | f/8 to f/11 for products, f/4 to f/5.6 for macro | Keeps everything sharp without a tripod |
| ISO | 100 to 400 | Keeps noise low inside a bright white box |
| Shutter speed | 1/125 second or faster on a tripod | Freezes any movement from the subject or a clipped light |
| White balance | Daylight, fixed | Neutralises the lamp colour cast |
| Focus | Single point on the subject | No contrast in a white box to autofocus on |
Common Mistakes
Almost every disappointing light box result comes from one of seven things. Each has a quick fix.
| Problem | Cause | Fix |
|---|---|---|
| Hot spot on the subject | One lamp too close, or the diffuser is too thin | Move the lamp back, add a second layer of tracing paper |
| One side brighter | Lamps at different distances or heights | Measure and equalise both lamps to the panel |
| Hard dark shadow | Lamp inside the box, or no side windows cut | Move lamps outside and cut all three windows |
| Glare on a glossy item | Box frame or crinkled foil reflected in the surface | Enlarge the windows, move the subject inward, flatten the foil |
| Yellowish or green cast | Lamp is not daylight rated, white balance on auto | Use a 5000K lamp, set a fixed white balance |
| Paint flaking after a few weeks | Plastic was not scuffed or primed | Scuff, prime, then paint, or skip paint and use poster board |
| Box wobbling mid-shoot | Too much cardboard removed for the windows | Reinforce the base with a second sheet or a wood offcut |
One design decision worth repeating: fix the diffuser with tape or hook-and-loop rather than staples. A stapled sheet is a one-way door, and you will want to change it the moment you decide your light needs softening.
If you want to spend nothing at all, hang a white sheet over a table and put the subject underneath near a north-facing window. It is a worse light box, but it is free and it works for flat craft projects and tracing.
Two Other Builds From the Same Idea
Variant: a tracing light box
For drawing and tracing, you need light coming up through the surface rather than wrapping in from the sides. Put a frosted acrylic or diffusing sheet in the lid, mount an LED strip inside along the back edge on foam tape, and line the interior white. This build needs brighter lamps than a photo box because you are looking through the paper, so test against a heavy sheet before you commit.
Variant: a kids sensory light table
For a sensory table, use a translucent plastic storage bin as the shell and a string of white LEDs taped along the inside rim. Nothing gets cut, so it comes apart in minutes, and a plastic bin with a frosted lid will not break if someone leans on it. That last point matters more than it sounds.
Frequently Asked Questions
How much does it cost to make a light box at home?
A basic version costs a few dollars if you already own a box and some paper, and roughly fifteen to twenty-five dollars if you are buying everything, mainly for LED lamps and a sheet of poster board. The expensive item is always the light source, not the container. Build once and the running cost is zero.
What size cardboard box should I use for a homemade light box?
Choose a box that leaves at least four inches of clearance around your subject on every side. A shoebox suits rings and small electronics, a twelve-inch scrapbook box handles cosmetics and jars, and a medium parcel box covers plates and craft projects. Deeper beats wider, because the lamps sit further from the subject and the light comes out softer.
Can I use a regular LED bulb instead of a photography light?
Yes. A household LED bulb in a clamp lamp works fine as long as it is rated near 5000K, which matches daylight and stops white paper looking yellow. The bulb must sit outside the box, roughly a foot from the diffuser. Avoid cheap bulbs with a low colour rendering index, since they shift reds and skin tones noticeably.
How do I photograph flowers in a homemade light box?
Lay the stems on the white sweep with a little water in a small clear container so they do not wilt during a long session. Skip the diffuser on the window nearest the camera, or lift it, so you keep a clear line of sight for the front of the flower. Shoot square on with a longer focal length and a small aperture for the whole bloom in focus.
Can I make a light box for photographing small objects and crafts?
That is exactly what this build is for. Small electronics, jewellery, resin pieces, flat lays and paper crafts all benefit from shadow-free wrap-around light, and the card, white paint and layered paper costs nothing extra. Just confirm the box is wide enough that your hands can reach in and arrange the subject without touching the diffusers.
Conclusion
A cardboard box, three cut windows, a sheet of tracing paper, a curved white sweep and two LED lamps give you repeatable studio light for well under the cost of a commercial box, and about 45 minutes of work. Start with the simplest version: a small box, diffusers on all three openings, poster board on the base, both lamps at the same distance. Test evenness with a plain sheet of paper before you shoot anything you care about, and only then consider upgrades like frosted acrylic or a deeper cabinet.