
To find pattern and repetition outdoors, you scan for the same shape, colour, line or texture appearing three or more times, then change your height, distance and angle until the repeats line up. Most people walk past these subjects every day without noticing them. Give yourself 20 minutes, walk slowly, and keep your camera ready.
The hard part isn’t spotting repetition. It’s learning to see it as arrangement rather than clutter, and to decide what to leave out. That skill transfers to any outdoor shoot, in any weather, with whatever camera you have.
Table of Contents
- What You Need
- Step-by-Step: How to Find Pattern and Repetition Outdoors
- Start with a Repeating Subject
- Look for Rhythm and Intervals
- Change Your Viewing Position
- Use Light to Separate the Pattern
- Simplify the Frame
- Make Several Compositions
- Common Mistakes and How to Fix Them
- Frequently Asked Questions
- What is the easiest way to find patterns outdoors?
- Can I photograph repeating patterns with a smartphone?
- What kinds of outdoor subjects create the strongest repetition?
- Does a pattern have to be perfectly symmetrical to make a good photograph?
- How can I make a repeating pattern more visually interesting?
- What time of day is best for photographing patterns and shadows?
- Conclusion
What You Need
Almost nothing. Pattern work rewards attention more than equipment.
- A camera or phone. A phone handles this job well, because most patterns are small and close. Use the tap-to-focus on the repeating element, then slide exposure down a little if the light is bright.
- One optional telephoto or zoom range. Not required, but it lets you compress a row of trees or fence posts into a tight grid without walking into private ground. A wide angle does the opposite, exaggerating the gap between near and far elements.
- Comfortable shoes. Crouching and kneeling is part of the method, and you will do more of it than you expect.
- A short observation routine. Pick five movements and repeat them at every stop: look up, look down, get close, step back, change your angle.
Start in aperture priority around f/8 on a camera, or the equivalent on a phone, and let the camera handle the rest. You want most of the pattern sharp, because a pattern only reads as a pattern if the repeats are equally sharp.
Step-by-Step: How to Find Pattern and Repetition Outdoors
Start with a Repeating Subject
A pattern is any visual element that repeats in a predictable way. Repetition is that same element appearing more than once in the frame. In practice you use the two words interchangeably, and a pattern rarely exists without repetition behind it.
Three similar units is the practical minimum. Two circles is a coincidence; six fence posts in a line is a pattern. Once you have three, the eye starts predicting what comes next, and that prediction is what makes the image satisfying.
Scan for six things as you walk:
- Circles and rings — tree rings on a cut stump, ripples in a puddle, lichen rosettes, concentric cracks in dried mud.
- Lines — furrows in a field, strata in a rock face, cracks in pavement, wires strung across a field.
- Colour — a canopy going from green to gold, a hedge studded with berries, a verge of purple thistle.
- Texture — bark, gravel shingle, cracked clay, the scales of a pine cone.
- Shape — identical windows, rooflines, fence posts, gate slats, balustrades.
- Repeated objects — rows of crops, stepping stones, branches along a single stem, leaves on one twig.
You worked it out if a stranger could describe the frame in one sentence using the word “rows”, “grid” or “bands”.
Look for Rhythm and Intervals

Rhythm is what the spacing between repeats does to the eye. Four types show up outdoors more than any others.
Regular rhythm means even spacing: fence posts, floor tiles, picket lines, a row of streetlights. It reads as calm and order.
Progressive rhythm means the repeats change size or spacing each time: wave crests breaking nearer and nearer, ripples spreading outward, crop rows converging toward a vanishing point. It reads as movement, and it’s the most dynamic of the four.
Alternating rhythm means two elements swap: light and dark bands in a rock face, a row of windows with the same arch repeated, sun and shadow across a fence.
Random rhythm means repeats with no spacing rule at all: leaf litter, shingle, cracked ice. It still works as a pattern, but the frame needs a little more help from light or angle to cohere.
Check the gap between units as carefully as the units themselves. A row that’s evenly spaced for ten metres and then breaks because a post is missing gives you a pattern break, which is a gift, not a flaw.
Change Your Viewing Position
Move before you zoom. The same fence is a different subject from four positions: straight on, along it, crouching at grass level, and from a step or a rise behind it.
Standing height is the least interesting viewpoint, because it’s the one where the ground plane cuts across everything. Crouching gets the repeats stacked cleanly. Walking into the row turns perspective into converging lines. From slightly above, the same subjects flatten into a graphic arrangement.
The test is simple. Make the shot, then take two steps left or right and make it again. If the second one is stronger, keep that direction and push further.
Use Light to Separate the Pattern
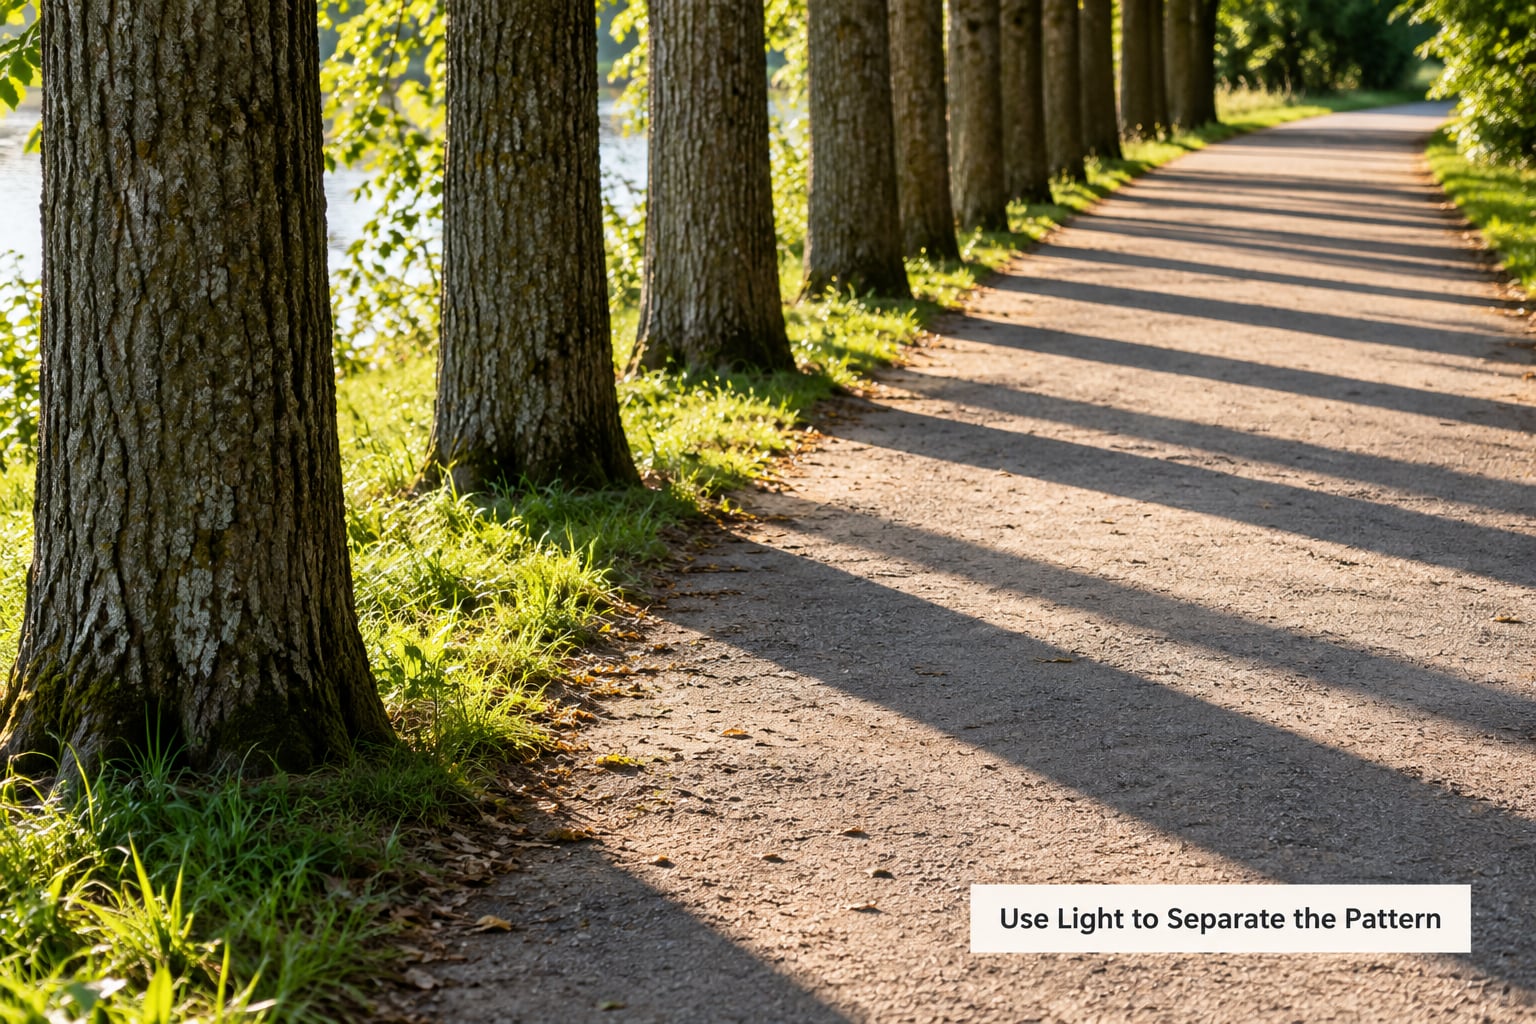
Flat midday sun is the reason most pattern shots feel lifeless. It lights everything evenly, so texture and spacing flatten into the same grey. The fix is light coming from the side.
Morning and late afternoon sidelight is the strongest condition. It rakes across bark, ripples and stone, throwing small shadows behind every repeat so each one separates from its neighbours. Watch the sun angle rather than the clock: within an hour of sunrise and before about an hour before sunset, you’ll get this most days.
Backlight turns thin repeating elements into silhouettes and halos. A row of bare winter branches, seed heads, or fence wire against low sun reads very differently from the same row lit from the front.
Overcast light isn’t a write-off. Soft even light is ideal for colour repetition and for keeping large patterns sharp, because there’s no harsh highlight to blow out. Look for reflected light instead — a pale wall bouncing light into a shadowed arch, or wet pavement reflecting a row of lamps.
Reflections double a pattern for free. A still puddle under a row of trees gives you a top half and a bottom half, and the slight distortion usually improves the frame.
Simplify the Frame
Now cut. Ask what the picture is actually about, then remove everything that isn’t serving that one idea. A leaf-covered path plus a line of footprints works. Add a bin, a sign, three people and a parked car and the pattern disappears inside the noise.
Then decide between filling the frame and leaving air. Filling it suits texture, bark, gravel and small repeats; nothing is louder than an edge-to-edge surface. Leaving air suits rows, architecture and anything with a vanishing point, because the empty space is what the rhythm needs to travel through.
One habit to break early: putting the subject dead centre. Composition critique threads on photography forums keep raising the same two complaints, and this is one of them. Offset the row so it enters from an edge, or place a single break point on a third. If a centred frame genuinely works, the light should be doing something on the opposite side to hold it.
Make Several Compositions
Don’t stop at one. Any good pattern supports four or five frames from the same spot:
- Wide scene — the pattern in its environment, for context.
- Close detail — three or four repeats, filling the frame.
- Symmetrical frame — square to the subject, a central column or a gate dead in the middle.
- Abstract texture — a single material shot flat, with no depth cues left at all.
- The break — the same subject with the odd one out placed off-centre.
Shooting a set is also how you learn. Photographers on critique boards keep saying the fastest way to improve is to copy a shot you admire, then shoot your own version of it. A five-frame set is a low-cost version of that.
Common Mistakes and How to Fix Them
Forcing the pattern. If you have to hunt for more than a minute, the repeats probably aren’t strong enough. Move on; there are usually better subjects within 50 metres.
Photographing from too far away. Distance shrinks repeats until they blur together. Walk in until the units are clearly separate, then step back to check you still like it.
Including a distracting background. A bright object at the edge of the frame pulls the eye out. Reposition one step, or reframe, before you raise the contrast in software.
Using one focal length for everything. Wide for a big structure, normal for a single row, long for compression, and your closest focusing distance for texture. Switching focal length solves more composition problems than any editing trick.
Missing subtle repetition. Spacing and interval are pattern too. The gaps between fence posts, the intervals between ripples, the spacing of needles on a twig — these read as rhythm even when every unit looks different.
Shooting in flat light. Wait 40 minutes, come back the other side of the walk, or turn the subject into a silhouette. If the light won’t change, look for pattern breaks and colour instead of texture.
Leaving too much context. This is the most common beginner failure in outdoor work. Too much foreground clutter dilutes whatever you were trying to emphasise. Take one frame with the minimum included, then add back only if the first looks empty.
Stopping at one frame. The keeper is usually the fourth or fifth idea, not the first. Give every strong pattern three variations before you move on.
Frequently Asked Questions
What is the easiest way to find patterns outdoors?
Slow down and use a fixed five-movement routine: look up, look down, get close, step back, change your angle. Most patterns are already around you — fence lines, tree rows, pavement cracks, roof tiles, ripples. Repeating the same routine at every stop trains your eye faster than walking further, and most sessions produce a keeper within twenty minutes.
Can I photograph repeating patterns with a smartphone?
Yes. Most pattern work happens at arm’s length, which is a phone’s best range. Tap the focus on the repeating element, pull exposure down slightly in bright light, and hold the phone parallel to the surface to reduce distortion. Phones also give you a square crop instantly, so you can shoot a frame and reframe it later without losing the original edges.
What kinds of outdoor subjects create the strongest repetition?
Anything that repeats the same shape or colour at least three times: rows of tree trunks, fence posts, waves, dune ripples, brickwork, window grids, crop rows, gravel, tree rings, and branching fern fronds. Human-made subjects give you even spacing and predictable shapes. Natural subjects give you richer colour and texture. Strongest results usually come from combining both — a man-made row with organic light falling across it.
Does a pattern have to be perfectly symmetrical to make a good photograph?
No. Symmetry is only one type of pattern, and a perfectly centred frame is often the weakest version of it. What matters is that the eye can read the arrangement — uneven spacing, a shifting angle or one element breaking the run all create more interest than rigid mirror symmetry. Save the centred, symmetrical frame for subjects that genuinely demand it, like a doorway or a single tree in a field.
How can I make a repeating pattern more visually interesting?
Four moves work reliably. Shoot from a lower or higher angle so the repeats stack. Let one element break the sequence and place it off-centre, which gives the eye somewhere to land. Use side light so each repeat casts a small shadow and separates from its neighbours. Then shoot a tight detail and a wide scene of the same subject so the viewer can read the pattern and the scale.
What time of day is best for photographing patterns and shadows?
Within about an hour after sunrise and an hour before sunset, the sun sits low enough to light everything from the side, which is what makes texture and repeated shapes read clearly. Shadows stretch far enough to build a second pattern across the ground. Overcast days are fine for colour repetition and reflections; just look for reflected light off walls, water or wet surfaces instead of direct sun.
Conclusion
On your next walk, give yourself 20 minutes and slow down before you raise the camera. Scan for repeated shapes and the spacing between them, then make two photographs of the strongest subject you find: one wide, one close, and one from a different height than feels natural.
That routine is the whole method. Repeat it often enough and the patterns stop being something you walk past.