How to photograph texture well comes down to four things: light that travels across the surface, a viewpoint low enough to see the raised bits, focus placed on one specific detail, and an aperture that keeps enough of the subject readable. Get those four right and a plank of ordinary wood or a folded jumper looks like something you could press a thumb into.
The beginner mistake is treating texture as a close-up problem. It is a light problem first. Point any light straight at a surface and the shadows under every ridge fill in, so the surface flattens into a grey shape. Move that light to the side and the same ridges throw small shadows beside themselves, which is what your eye reads as texture.
You also do not need special gear. A phone, a window and a boring object from a kitchen drawer are enough to learn all seven steps below. Add a tripod and a macro lens later, after you know which part of the process you actually need help with.
Table of Contents
- What You Need
- Step-by-Step
- 1. Choose a Subject With Clear Surface Detail
- 2. Use Light to Reveal Texture
- 3. Change Your Camera or Phone Angle
- 4. Set Focus on the Most Important Detail
- 5. Control Depth of Field
- 6. Add Contrast Without Losing Detail
- 7. Try Several Distances and Compositions
- Common Mistakes
- Frequently Asked Questions
- Can I photograph texture with a smartphone?
- What lighting is best for showing texture?
- Do I need a macro lens to photograph texture?
- How do I keep the whole subject sharp when photographing texture?
- How do I edit a texture photo so the detail still looks natural?
- Conclusion
What You Need

The minimum kit is a camera or phone that focuses at close range, one textured subject, and a single light source you can move. That is the whole list. Everything else is convenience.
For the subject, pick three objects with very different surfaces and put them side by side. Rough wood or bark gives deep cracks. Linen or wool gives fine fuzz and weave. A glazed ceramic cup gives a smooth surface that reflects light, which is the useful contrast case. Having all three at once teaches you more in ten minutes than a single subject does in an hour.
For light, a window works and costs nothing. A desk lamp with a shade works better because you can push it close and make it small and hard. A sheet of white paper or a thin curtain turns a hard source into a soft one, which is what you want for the smooth surface and away from the rough one.
Two optional aids pay for themselves fast. A tripod or a stable stack of books stops the small shakes that ruin close-ups, because magnification amplifies movement. A small piece of clear plastic or a ruler, taped to the base of a phone, works as a makeshift focusing screen when you cannot see the detail on the display clearly.
Skip buying anything until you have shot twenty frames of one subject in bad light and good light. You will learn within a week which tool is actually missing for the pictures you want.
Step-by-Step
1. Choose a Subject With Clear Surface Detail
Look for materials that already have visible relief before you lift the camera: tree bark with cracks, stone with grain, moss, woven fabric, rusted metal, cracked paint, a dry leaf, the skin of a citrus fruit, coffee grounds, a sliced loaf end.
Run a fingertip across the surface. Where you feel an edge, a ridge or a sudden change in level, the camera has something to record. Flat shiny surfaces are the exception, and they only work when the light reflects in a controlled way.
Check for a second texture in the background, such as a wall behind the object. A plain background makes the subject’s own texture carry the frame, which suits beginners because there is nowhere for the eye to wander.
2. Use Light to Reveal Texture
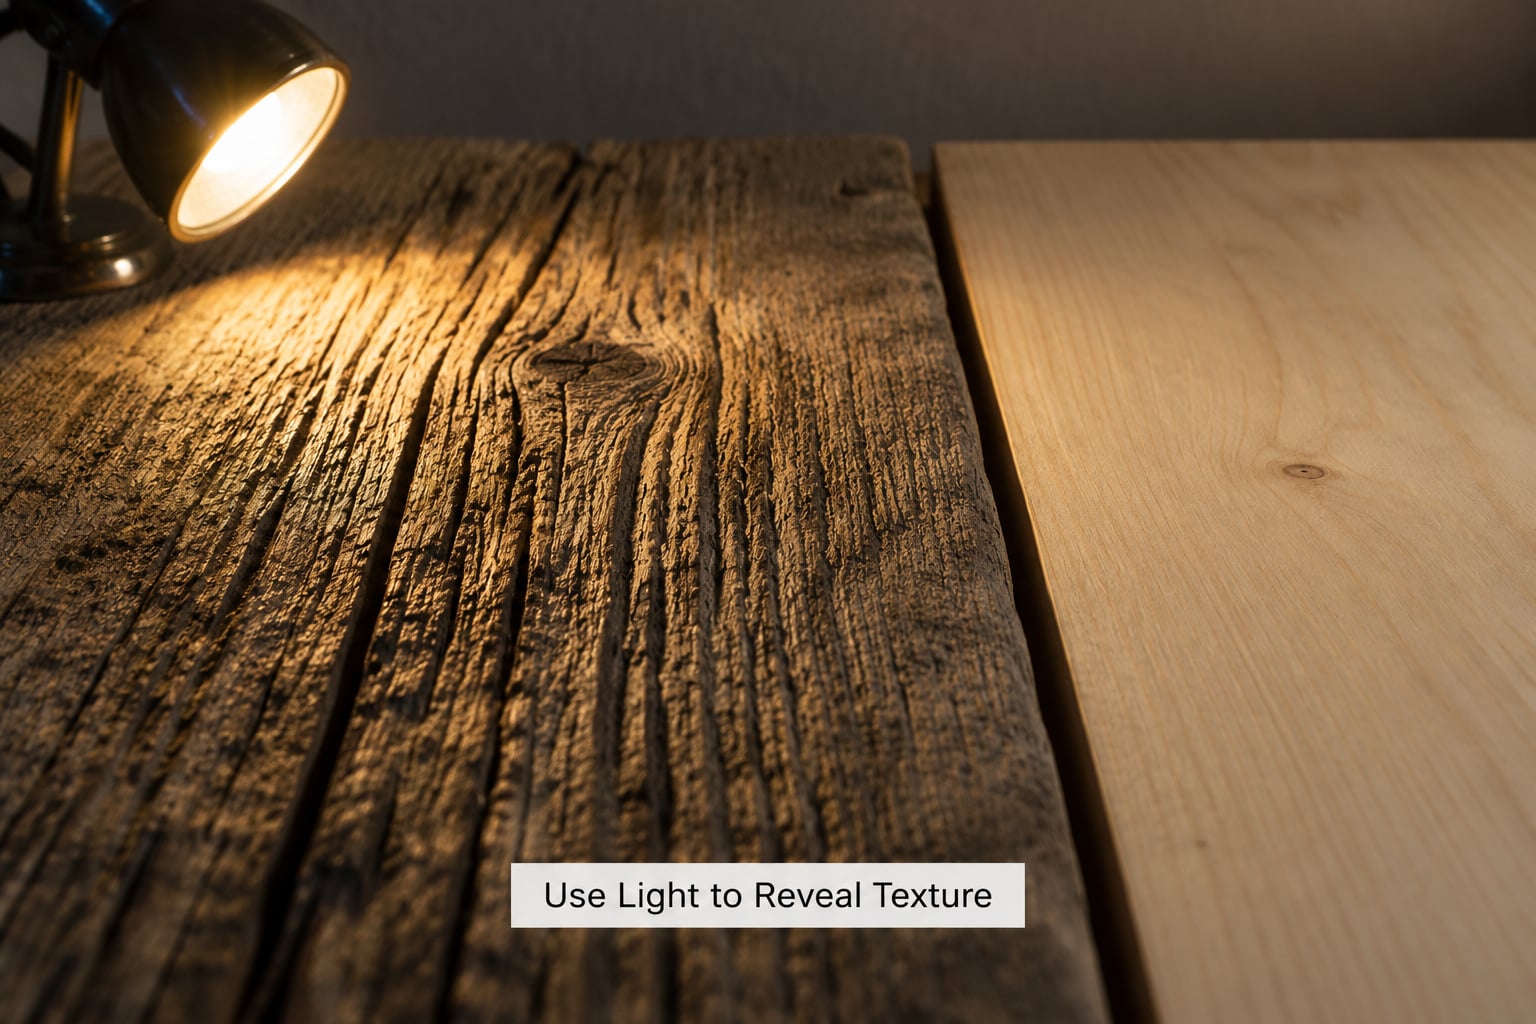
Place your light at roughly 20 to 45 degrees from the camera-to-subject line, and lower it until it is nearly level with the surface. This is called raking light, and it is the single most useful technique for showing texture.
You will know it worked when the raised areas show bright tops and the valleys beside them go noticeably darker. If the whole surface is one even tone, move the light further to the side or drop it lower before changing anything else in the camera.
Backlighting works well for thin or translucent subjects like leaves, feathers and fabric, where the light passes through and outlines the veins. Front light is the one to avoid for texture work, since it fills in every shadow that would otherwise describe the surface.
Overcast conditions look soft and forgiving but produce very flat light, so outdoor texture shots in even cloud often look dull. Early morning and late afternoon light comes in at a low angle by nature and does this job for you.
3. Change Your Camera or Phone Angle
Shoot from a low, oblique angle rather than straight down whenever the surface has ridges, fibres or unevenness. Looking across the surface exaggerates the height of each raised bit, because you see both its top and the shadow it throws.
A straight-down angle suits flatter subjects such as fabric laid on a table, tiled floors, or a printed page, where you want the pattern as a shape rather than as depth.
Move in small steps and shoot at each one. Most people stop too early because getting close feels intrusive, and the frame that finally looks right is usually closer than the last one they tried.
4. Set Focus on the Most Important Detail
Decide which single detail carries the picture, usually the sharpest ridge or the deepest crack, and put focus there. In single-point autofocus mode, move the focus point onto that exact spot rather than leaving it in the centre with the subject filling the frame.
On a phone, tap the screen directly on the detail you want sharp, then use the exposure slider that appears to pull brightness down slightly. Slightly darker files hold far more texture in the bright areas of a rough surface.
Switch to manual focus when the camera keeps hunting or the autofocus shifts between frames, which happens constantly at very close distances. Live view magnification helps you check the focus by zooming in on the display, then returning to full view before the shot.
5. Control Depth of Field
At close range, depth of field gets shallow very quickly, so the same aperture that looks fine at arm’s length leaves an inch of your subject sharp. Start around f/8 and move toward f/11 or f/16 when you need more of the surface in focus.
Raising the f-number costs light, so pair it with a slower shutter speed, an ISO of 100 to 200, or a brighter light source. On a tripod, a shutter speed well under 1/60 of a second is not a problem at all.
If blur from hand movement ruins a shot, a tripod is a better fix than a smaller aperture, because stacking two slow shutter speeds adds more shake than it solves. Focus stacking is the other option: shoot several frames at slightly different focus distances and merge them in software or in the camera, which keeps every part of the surface sharp regardless of aperture.
6. Add Contrast Without Losing Detail
Contrast comes from three places: the direction of the light, how much you are exposing, and how you edit. Fix the first two before touching the third, because an edit cannot create shadows that the light never made.
Expose for the brightest part of the surface rather than the average. Bright ridges clip to pure white and lose all their detail, and clipped white is unrecoverable in any editor.
In editing software, a small amount of clarity or structure adds mid-tone contrast and makes grain and weave read more strongly. Add a little less than looks right in the preview at full size. If the file needs more than a modest push, the light was flat and the picture will feel harsh rather than detailed.
Converting a texture shot to black and white often helps more than any slider, because it removes colour cues that compete with surface detail. Slightly raised contrast and a touch of grain suit rough subjects well.
7. Try Several Distances and Compositions
Shoot three frames of every subject: one close enough that the surface fills the frame, one at arm’s length from the same spot, and one that includes the whole object. The middle frame usually tells you which detail deserves the close version.
Change one thing at a time. Keep the light where it is and move the camera, then keep the camera still and move the light. Otherwise you cannot tell which change improved the picture.
Try compositions where a crack or an edge of shadow runs diagonally out of a corner, and where the light falls off toward one side of the frame. Texture reads best when the frame has somewhere for the eye to travel.
Common Mistakes
Flat light from directly in front. Shadows under raised areas fill in and the surface turns into a grey shape. The fix is to move the light to the side and lower it until it is nearly level with the surface.
Focus landing on the wrong spot. The camera focuses on whatever fills the centre of the frame, which on a close-up is often a flat area above the detail you care about. Switch to a single focus point and drag it onto the sharpest ridge.
Too little depth of field. One thin slice of the subject is sharp and everything in front and behind it melts. Stop down a stop or two, move the camera back slightly and get closer again, or stack focus.
Blurred frames from hand movement. Magnification turns a small wrist movement into a large blur. Set the camera on a tripod or a stable surface, use a two-second timer or a remote release, and stop hunting for the last bit of depth of field at the cost of shake.
Blown highlights on the brightest ridges. Check the histogram after the shot and pull exposure down until the brightest parts stop clipping. Detail lost to pure white never comes back in editing.
Over-editing. Heavy clarity, sharpening and contrast produce a picture that looks crunchy and artificial rather than tactile. Most texture shots need a fraction of what the sliders invite you to apply.
Staying too far away. A distant frame shows an object with texture on it. Only a close frame shows the texture itself, so get closer than feels natural and crop afterwards if you need more context.
Frequently Asked Questions
Can I photograph texture with a smartphone?
Yes. A phone handles most texture work once you stop fighting it. Clean the lens first, since a smudged lens is the biggest cause of soft close-ups. Tap the screen on the detail you want sharp, pull exposure down a touch to protect bright ridges, and get close enough that the surface fills the frame. A phone has no aperture control, so use a slower subject distance or move back for more depth of field.
What lighting is best for showing texture?
Light that crosses the subject from one side at a low angle is the most effective, because it casts small shadows beside every raised area and reveals the surface relief. A window, a desk lamp pushed close, or a bare flash bounced onto a card all work. Keep the light roughly 20 to 45 degrees off the camera axis and low enough to graze the surface.
Do I need a macro lens to photograph texture?
No. A macro lens helps with very small subjects and true 1:1 magnification, but a normal lens or a phone camera can still reveal texture by getting close, using a longer focal length, or photographing a larger portion of a surface. Extension tubes and clip-on macro lenses are cheaper ways to get closer when you need it.
How do I keep the whole subject sharp when photographing texture?
You rarely need the entire subject sharp. Focus on the most important raised area, then use a moderate aperture such as f/8 to f/11 and a sensible subject distance to keep useful depth of field. When you genuinely need edge-to-edge sharpness on bark, stone or fabric weave, focus stacking is the reliable answer: shoot a short series at different focus distances and merge them.
How do I edit a texture photo so the detail still looks natural?
Start by protecting the highlights, since clipped whites cannot be recovered, then add a small amount of clarity or structure and a slight contrast lift. Work in small increments and zoom out to check. If a texture frame needs heavy slider work to look interesting, the original lighting was too flat, and a reshoot with side light will beat any amount of editing.
Conclusion
Pick one textured object you already own, put a single light low and to one side, move closer than feels natural, and place focus on the sharpest ridge you can see. Shoot a handful of frames there and only then change anything.
Once the light is doing the work, add the refinements one at a time: a smaller aperture for depth, a tripod for stability, a modest clarity adjustment in editing. That sequence is the whole of how to photograph texture, and it takes about ten minutes per subject once you stop experimenting.